How to set up your personal s3 bucket for use with s3.fm
Your s3 bucket is your own personal destination for cloud storage.
If you already have an AWS account and would like us to set your bucket, we only charge $20. Contact us here.
NOTE: You must be using a paid subscription to s3.fm to use a personal s3 bucket. Click here to subscribe.
STEP ONE: CREATE THE BUCKET
First, we need to create a bucket for your files.
- If you don’t have one already, create an AWS account.
- Log into your AWS account and go to the s3 console.
- Click the orange “Create Bucket” button.

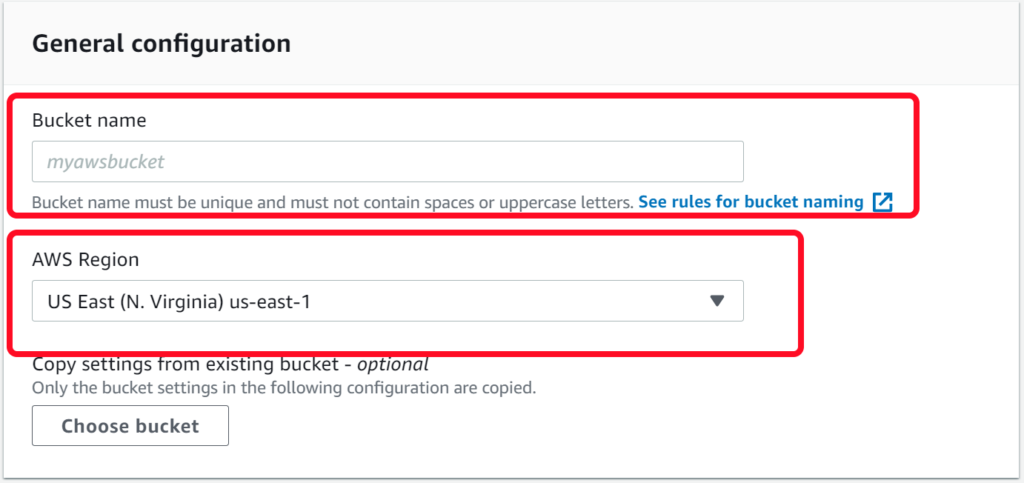
- Name your bucket according to AWS’s naming policy. Anyone who get links to your files will see your bucket name, so pick something that makes sense for your use case.
- Select a region for your bucket. Pick the region that is closest to you or the people who will be using the files in your bucket.

- Set your default privacy. If you are planning on permanently sharing at least some files, uncheck the “Block all public access” checkmark. If you’re planning on keeping all your files private unless you grant temporary access to individual files, leave the box checked. You can change this later if you’re not sure, so don’t dwell on it.

- Set default encryption. If the data you’re storing is of a sensitive nature (GDPR, HIPAA, PII, Banking, etc), you should enable encryption at rest. It does cost a very tiny bit more, but you won’t see much of a difference in performance.

- Click Create Bucket to move to the next screen.

STEP TWO: CREATE AN IAM POLICY FOR THE BUCKET
Now that we have a bucket, we need to grant s3.fm access to the bucket. An IAM policy is like a keycard. You program the policy to grant access only to specific services. It sounds hard but it’s pretty easy if you’re just copy-pasting.
- In a new browser window, go to the IAM console.
- click “Policies” on the left side.

- Click Create Policy.

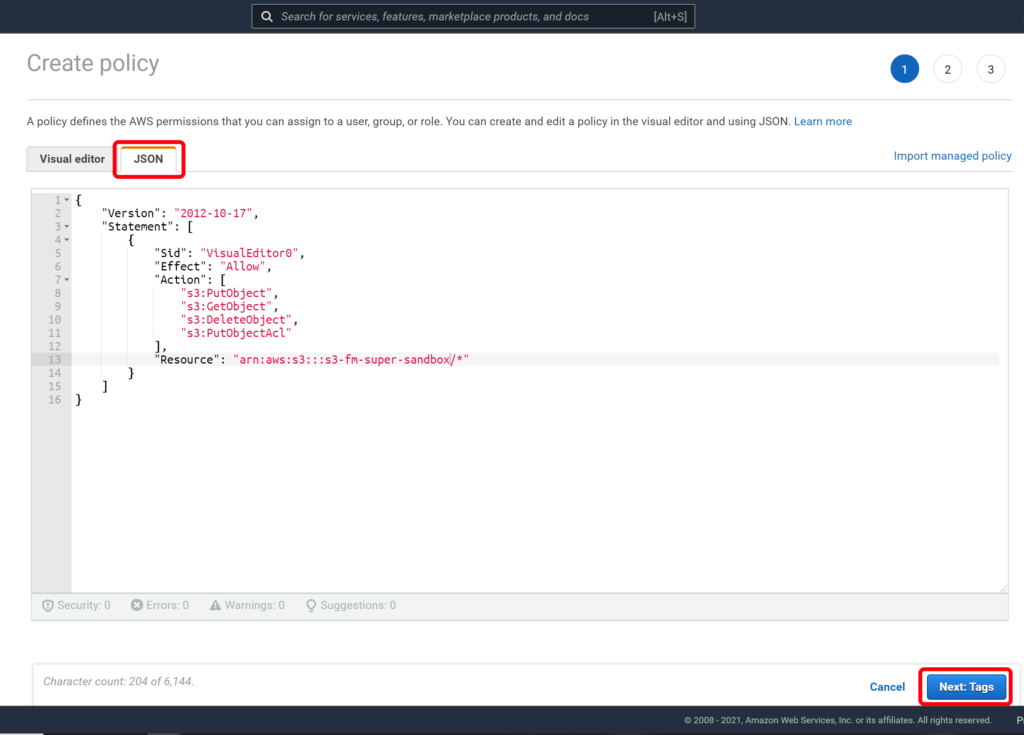
- Click JSON.
- Delete everything in the JSON Editor.
- Copy-Paste this JSON into the editor, replacing the word XXXXXXXXXMYBUCKETNAME with the s3 bucket name you created in step one.
{
    "Version": "2012-10-17",
    "Statement": [
        {
            "Sid": "VisualEditor0",
            "Effect": "Allow",
            "Action": [
                "s3:PutObject",
                "s3:GetObject",
                "s3:DeleteObject",
                "s3:PutObjectAcl"
            ],
            "Resource": "arn:aws:s3:::XXXXXXXXXXXXXXXXXXXXMYBUCKETNAME/*"
        }
    ]
}
It should look like this when you’re done.

- Click “Next: Tags”.
- Click “Next: Review”.
- Name your Policy “s3fm-s3-bucket-access”.
- Write a description if you want.
- Click “Create policy”.

This should return you to the IAM console. Good work! Two more steps to go.
STEP THREE: ASSIGN THE POLICY TO A USER
Now that we have a policy, we need to assign it to a user.
- Click Users, then click Add Users.

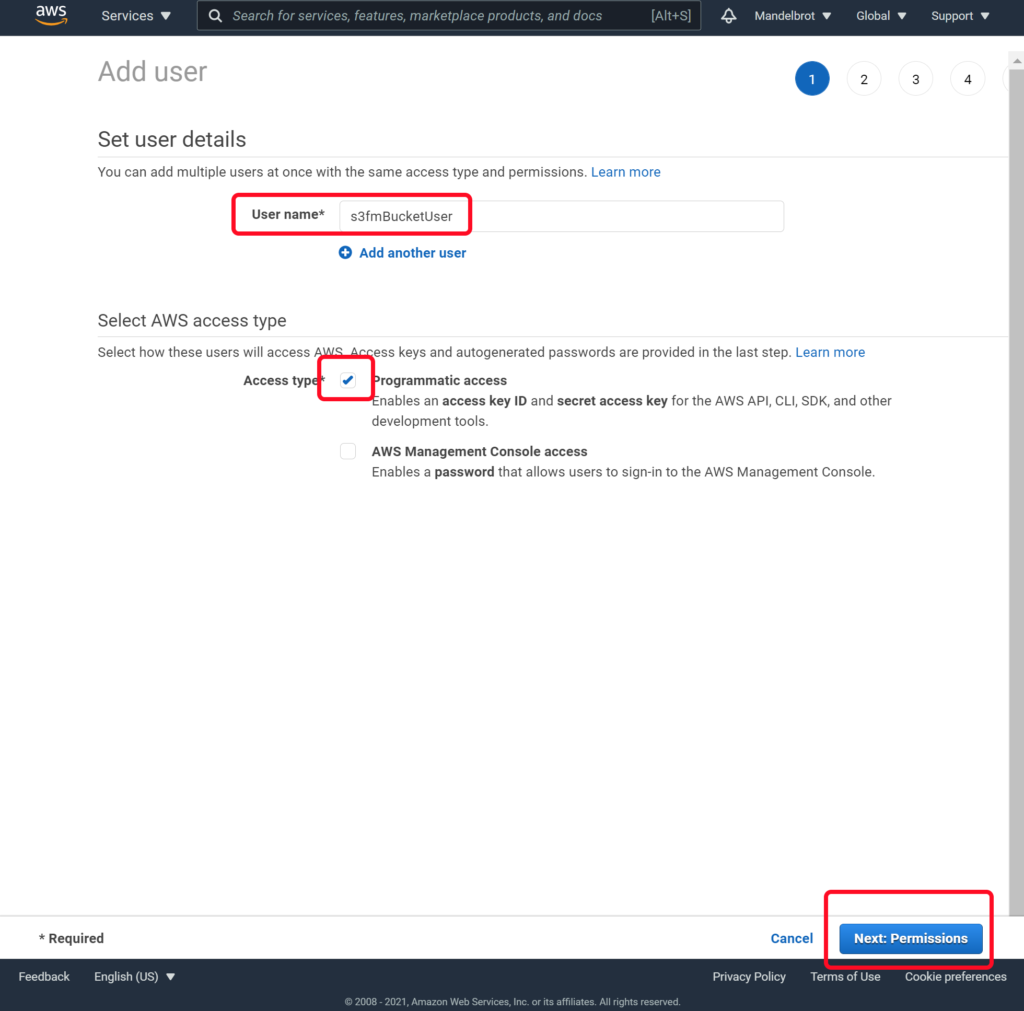
- Create a name for the User. You can name it however you want, but make it functional. s3fmBucketUser is a good name if you’d rather not be creative.
- Check the “Programmatic access” checkbox.
- Click “Next: Permssions”.

- Click “Attach existing policies directly”.
- Start typing in the name of your policy from step two in the filter field. (s3fm-s3-bucket-access)
- Check the box next to your policy.
- Click “Next: Tags”.
- Click “Create user”.

AWS now has generated a username and password for s3.fm to access your s3 bucket.
- Leave your browser window open, you’ll need the credentials in step four.
- If you accidentally close your browser window, repeat step three.
STEP FOUR: STORE YOUR CREDENTIALS IN S3.FM
Now that you have a username and password for your S3 bucket, you’ll need to share your s3 credentials with us to allow us to upload to your s3 bucket. This is done in the API Explorer .fmp12 file.
- Open the API Explorer with FileMaker Pro.
- Paste your s3.fm API key into the API key field. Click the s3.fm logo in the top left corner. Once pasted in, the API Explorer will verify your API key’s subscription.
- From there, just follow the prompts.
